Are you building a SIG P320 from the 80% JSD MUP 1 insert? Do you want to make sure you end up with a quality Fire Control Unit (FCU)? Are you maybe even considering chambering it in .45 ACP, but can’t seem to find any documentation on the “minor modifications” required? Well here are a few tips and lessons I’ve learned along the way. I hope you find them helpful.
The SIG SAUER P320 is an amazing, versatile, highly reliable, and very accurate pistol platform. If you’ve made your way to this post, I probably don’t need to try to convince you of that. Just consider that the P320 is now the U.S. military’s pistol of choice–in the M17 variant for the Army, and the M18 version for Marines, Air Force, Coast Guard and Navy. Even several other U.S. Government agencies (such as ICE) have selected a version of the P320 as their standard service weapon.
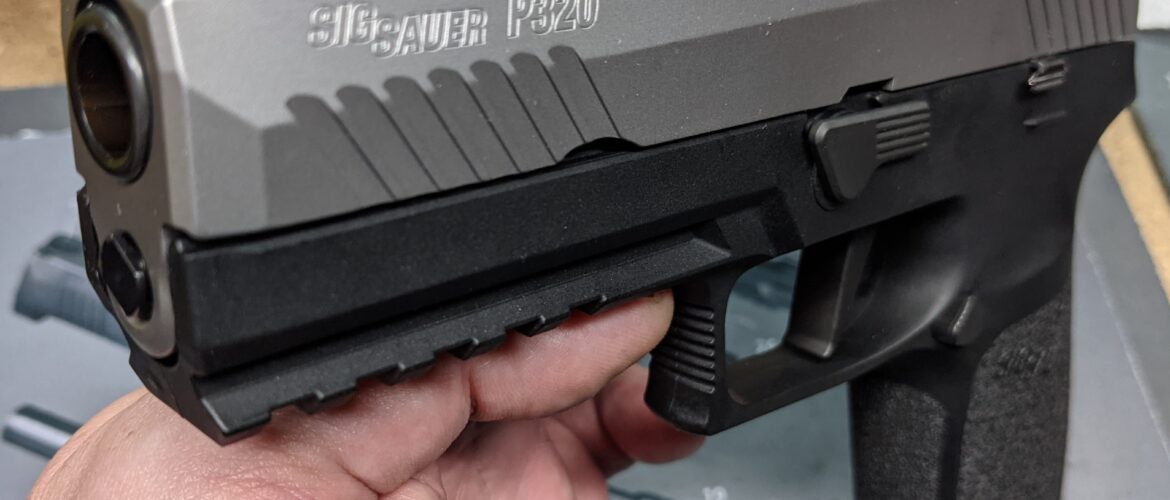
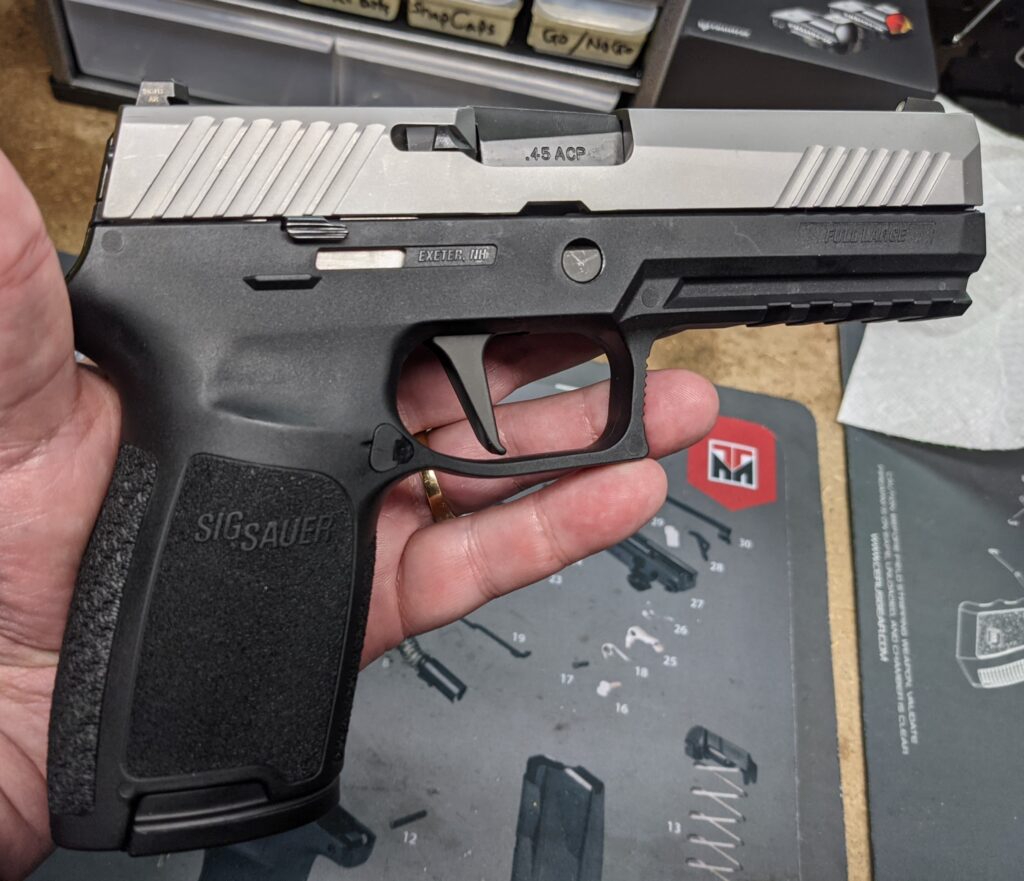
So now you’ve decided to try to build a P320 for yourself. Or maybe more than one? Join the club. It’s quickly becoming a very popular build. Here’s one of my early P320 builds, and still one of my go-to choices for concealed carry in many situations.
Building a P320 80%: Just how difficult is it?
So you might ask what you are getting yourself into if you decide to build a SIG P320 from an 80% FCU. I guess there are several ways to tackle that question. If you’ve ever built a Polymer 80 Glock clone, I’d start by saying it’s slightly more involved or complex than that. You need a few more specialized tools–especially a drill press. And it takes a bit longer. But the good news is that it’s easier to get top quality results with a P320 build because there is less freehand work required, and generally fewer issues with “tolerance stacking” that often require custom fitment work with the Polymer 80s if you want the gun to run smoothly. And once you’ve built an FCU, it’s super easy to change out grip modules and slides for different configurations or calibers (with some limits).
I would also say it’s a little less work than a typical AR-15 80% build (using a modern jig). And a LOT less messy!
If you’ve never built a gun from scratch before, the P320 is a great first choice! You just need to spend some time getting the right equipment and setting it up properly, take your time, and you’ll be fine.
Speaking of time, you’ve probably seen all those hyped up media stories, or the press releases from certain politically motivated officials, about how an evil “ghost gun” can be built from scratch in 11 minutes using a butter knife, fingernail clippers and some duct tape. Even some of the 80% manufacturers–stupidly, in my opinion–over-sell how fast you can complete a build. Just forget all that.
I mean if my goal was to win some kind of race to build something capable of firing off a single shot for some illicit purpose, and I wasn’t worried at all about quality, workmanship or safety, then yeah, I could probably just skip the whole 80% parts market and whip up something in a few minutes with some common parts from the local hardware store. Why aren’t the over-regulators going after that?!
But if you want a beautiful, quality pistol that is as safe as a factory build, cycles like butter, shoots accurately (perhaps more accurately than an off-the-shelf model), and runs reliably for thousands upon thousands of rounds, it’s going to take a little time and a commitment to doing things properly. Just gathering all the needed tools–and especially the required parts–will take a few weeks in this crazy environment (early 2021, as I write this).
For your first build, once you have gathered all the parts and tools and fully set up your work area, I would plan on at least 6-8 hours of work–preferably spread over a weekend or a couple of evenings–just to get the basic build working. Then you need a little time on the range to get the sights dialed in, as well as the ejector on the .45 ACP model (more on that later). And if you want to add a red dot, or an adjustable trigger, or some other fancy stuff, that all takes additional time. Like anything else, once you’ve done it a few times, you’ll get a little more proficient.
Where can I learn how to build a P320 80%?
You’ve probably seen all the videos and web pages that are dedicated to 80% builds for Polymer 80 and other Glock clones, or the AR-15 platform. Because the platform is newer, and the 80% build options haven’t been available for very long, there is not quite as much info out there on the P320 as there is for some of those other platforms. Especially lacking is the information you need to know if you want to build a P320 chambered in the venerable .45 ACP.
By the way, for Glock builds, see Marine Gun Builder. He’s the best. No one else is even close. First Time Quality! MGB is currently working on a series of videos for the P320 platform, and I suspect those will largely obsolete what I’m publishing here once they’re released. He’s definitely the pro. I’m just a random guy on the Internet, trying to fill a gap in information in the meantime.
You definitely want to sign up for the forum on MGB. There’s a sub-page there dedicated to SIG SAUER builds. You’ll often find me posting and commenting there. It’s a great place to ask questions and share information.
In the meantime, while we’re all waiting for MGB to post his upcoming P320 video series, probably the best source for videos on P320 builds is The Rogue Banshee. Jason also does some interesting work on several other firearms platforms. Of course, you’ll also want to watch the brief official MUP 1 instructions video from JSD at least a time or two before starting your project.
What tools do I need to build a P320 from an 80% module?
MGB has already posted a list of tools for P320 builds in his forum. You’ll have to subscribe to the forum to see it. I’ll defer mostly to that list, with a few exceptions and additions noted here.
MGB recommends the WEN 4214 12-inch drill press, which runs a bit over $400. You can actually complete a P320 build just fine with the much less expensive WEN 4208 8-inch drill press. That’s what I personally use, and what I recommend. It’s less than one-fourth the price ($87.37, as I type this in early 2021). You’ll just need to use one little trick, which I’ll explain below. [UPDATE, 2022-02-07: I learned today that there is at least one scammer supposedly selling the WEN 4208 online out of Florida for this kind of price, but they apparently take your money and never deliver the product. Buyer beware! The 4208 has now been replaced by the 4208T, which seems to be available on reputable sites at prices closer to $120 these days.]
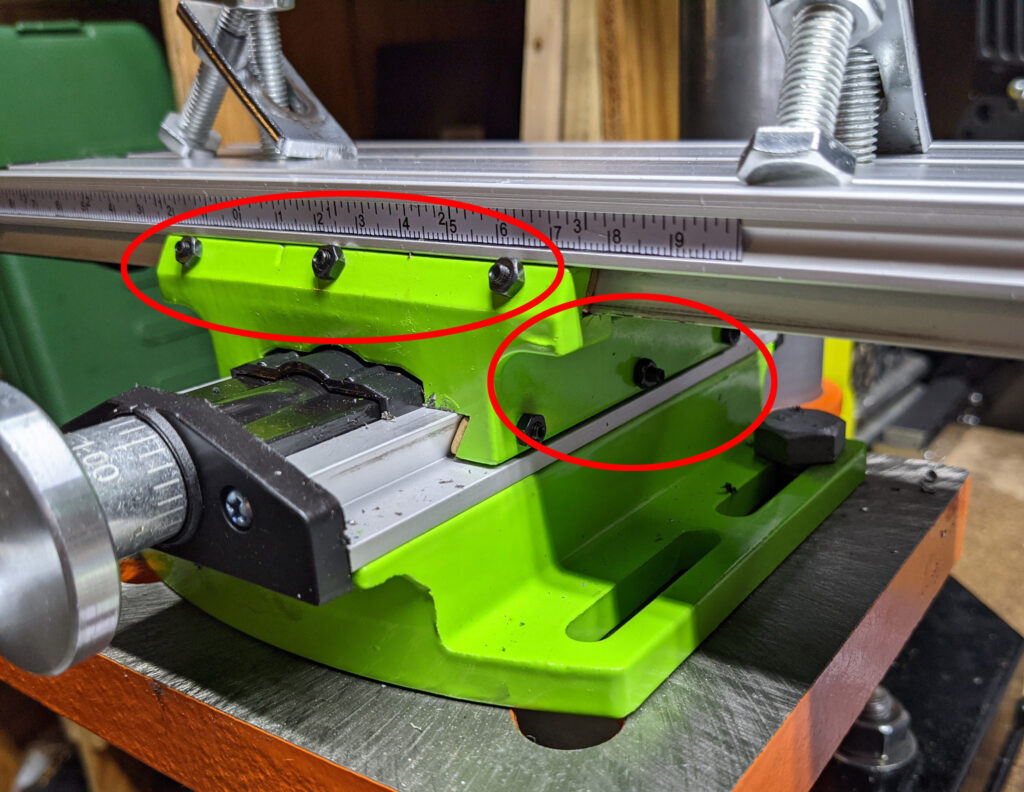
MGB recommends the WEN 424DPV drill press vise. But I definitely suggest spending about $20 more to get a nice X-Y milling work table. While it takes a little customization to fit this table onto your WEN 4208 drill press (trust me–you can figure it out!) having the ability to fine-tune X and Y adjustments will really save you a lot of time and make it easier to achieve quality, accurate drilling. And with the P320, there are lots of holes you need to drill accurately.
This X-Y table is definitely not a high-end, super precision product. If you can afford such a thing, great. But this one is perfectly acceptable as long as you take care to tighten up the slack in the adjustment screws from time to time. If you don’t, it will definitely loosen up over time and start to wobble as you drill. That’s not good. So check this before starting to drill.
Forget the drill bits that come with the JSD P320 jig. If you’re super slow and careful, they might work for one build. But they won’t last long, and chances are that you’ll probably burn up a bit or two before you finish your first build. So just throw them in the trash and get some quality cobalt bits, as recommended by MGB. I’ve used the same set of cobalt bits for nearly a dozen P320 builds now.
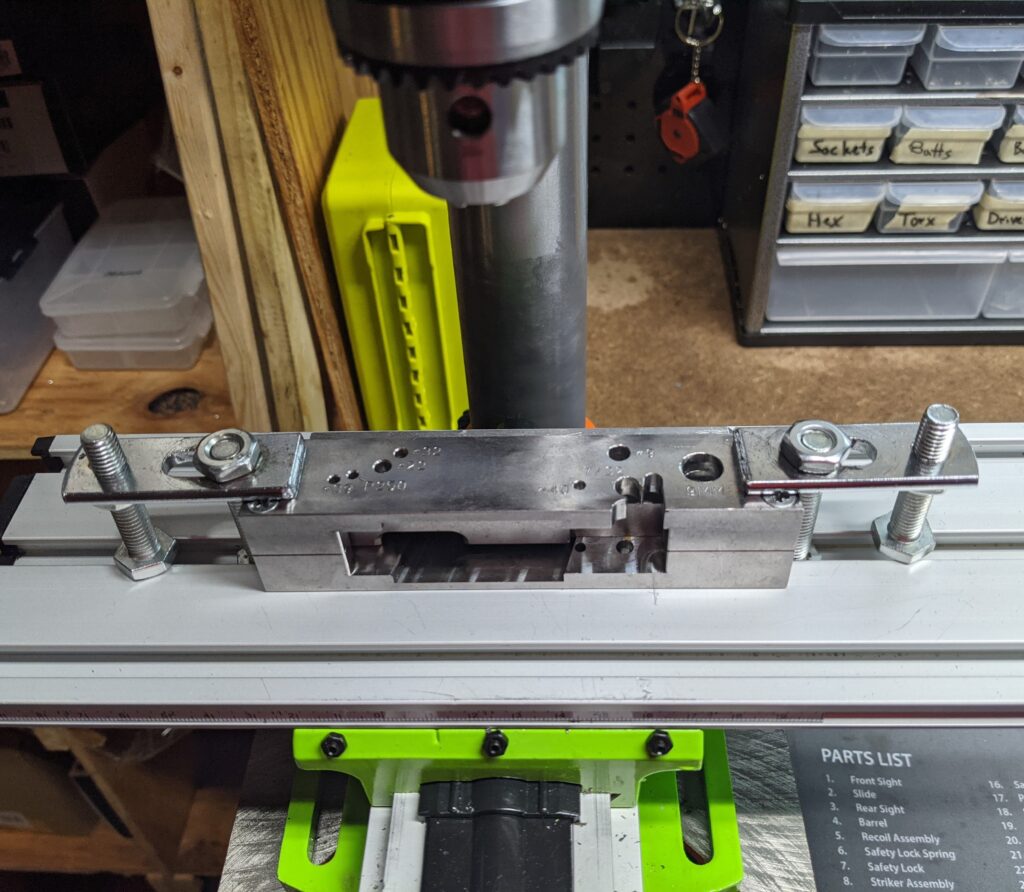
Now, one of the issues you will run into is that there is not quite enough clearance once you mount the X-Y milling work table to the WEN 4208 for a standard-length 9 mm bit to clear the JSD jig. But don’t worry–the workaround is simply to rotate the drill press work table to one side, push the jig up onto the bit, then rotate the work table into position. The bit will end up slightly inserted into the jig, but not quite touching the MUP 1 insert. This is fine as long as you carefully align the hole before you start drilling. You’ll only need to do this for the two 9 mm holes. All other bit changes will work out fine without having to reconfigure your setup.
In addition to MGB’s tool list, I suggest adding a narrow cut 4 file that has two safe sides, and if you don’t already have one, a Nicholson universal file handle to go with it. This file is really handy for getting into tight places without damaging sections you don’t want to mar. (Don’t tell anyone, but I also use this file sometimes on Polymer 80 tabs, right after the fret cutter does 95% of the work.)
I used to swear by the Grayguns P320 Armorer’s Block, but after MGB introduced us to The SIG Armorer’s Block, I’ve been using that quite a bit more. It’s definitely worth the investment.
Finally, MGB recommends Forney Tap Magic cutting fluid, and I’m sure that works great. But I’ve been using the Morris Products (Oatey) G30203 Dark Cutting Oil with great success. And it’s a lot cheaper.
What are the parts I need to complete a SIG P320 build?
For a typical P320 build, chambered in 9 mm, .40 S&W or .357 SIG, see the tables below for the basic parts you will need to acquire. Obviously, you will need the appropriate magazines, and you might want to add options like a red dot optic or light. And note that this list does not include the parts for a manual safety. (I’ll admit I’ve never actually built a P320 with a manual safety.)
The parts listed as “multiple” are where you can do most of your customization, either by choosing aftermarket parts, or sometimes even multiple offerings directly from SIG SAUER (e.g., you might prefer the SIG flat trigger vs. their more traditional curved trigger). Reference the SIG P320 schematic on SIG’s official P320 Small Parts Shopper page (which is one option for acquiring parts, although you can generally find better pricing elsewhere).
| SIG Schematic # | SIG Part # | Part | OEM Price |
| 1 | Multiple | Front Sight | Multiple |
| 2 | 1301042-01-R | Extractor | $19.00 |
| 3 | Multiple | Rear Sight | Multiple |
| 4 | Multiple | Slide | Multiple |
| 5 | 1300324-R | Extractor Pin (Extractor Plunger) | $7.00 |
| 6 | 1300521-R | Extractor Spring | $6.00 |
| 7 | 1301495-R | Extractor Spring Pin (Extractor Spring Guide) | $19.00 |
| 8 | Multiple | Barrel | Multiple |
| 9 | 1300926-R | Striker Assembly | $49.00 |
| 10 | Multiple | Rear Slide Cap | Multiple |
| 11 | Multiple | Recoil Spring Assembly | Multiple |
| SIG Schematic # | SIG Part # | Part | OEM Price |
| 12, 13 | Multiple | Grip Module | Multiple |
| 14, 15, 16 | KIT-320-MAG-RELEASE | Kit: Magazine Release, Catch Spring, Stop | $9.99 |
| 17 | 1300429-R | Slide Catch Lever Pin (Slide Catch Pivot Pin) | $8.00 |
| 18, 19, 21 | KIT-320-SCL | Kit: Slide Catch Lever, Spring, Post (9/40/357 only) | $10.00 |
| 20 | NA | JSD MUP-1 80% Fire Control Unit | $99.99 |
| 22 | SPRING-5 | Trigger Bar Spring | $4.00 |
| 23 | Multiple | Trigger | Multiple |
| 24 | 1300827-R | Trigger Stop Pin | $5.00 |
| 25, 30, 32, 33, 34, 35, 36 | 8900033 | Kit: Sear, Housing, Pin, Springs, Trigger Bar Disconnector | $49.00 |
| 26 | 1300674-R | Safety Lever Pin | $9.00 |
| 27 | 1302166-R | Take Down Safety Lever w/ Shortened Pin (9/40/357 only) | $29.00 |
| 28 | 1300777-03-R | Take Down Lever | $16.00 |
| 29 | 38000144-R | Take Down Lever O-Ring | $5.00 |
| 37 | 1300675-R | Trigger Bar | $29.00 |
| 38 | 1301341-R | Coiled Spring Pin 2.5 mm x 20 mm (Safety Lever Housing Pin) | $5.00 |
A few random tips for building your SIG SAUER P320
Here are a few lessons I’ve learned, mostly the hard way. 🙂
Once you put the MUP 1 in the jig, don’t remove it until the rails are bent and cut, and all the holes are drilled. Make sure the rails are fully bent down horizontally. By the way, you can probably get by with any old hammer, but I really like to use a 2- or 3-lb. dead blow hammer or rubber mallet.
Don’t hammer the rails while the jig is on the work platform of your drill press! I did this once, and ended up knocking the work table off level by about 3-4 degrees, and didn’t notice until after drilling all the holes. Ooops! Now I just do the hammering on a concrete surface, like the floor of my basement. Also, I use a square now to ensure the work table is perpendicular to the drill bit before I start a new project.
You might be tempted to remove the MUP 1 from the jig before cutting the rails, but this is pretty dangerous. While it’s in the jig, you can’t cut the rails too short. MGB’s new method looks pretty interesting, but I’ve found the “classic” method of using a hacksaw to work out just fine. Any standard 12-inch hacksaw with 24 tpi blades, like this Craftsman model, will do. Those mini-hacksaws (where the blade sticks out past the handle) aren’t going to work so well.
JSD recommends some specific speeds for each drill bit, and those are great if your drill press has continuously variable speed control. Since I’m using the WEN 4208 drill press, and it has only 5 fixed speeds, I simply use the next lower available speed from what JSD recommends. That’s worked just fine.
Also, since setting up the drilling operation for the 9 mm holes requires moving the work table, I do those holes first, then all the remaining holes can be drilled with minimal change to the setup. Here’s the drilling order I use to minimize setup changes, bit changes, speed changes, etc. (left side is the side with the takedown lever):
| Bit | Speed (rpm) | Side | # Holes |
| 9 mm | 740 | L | 1 |
| 9 mm | 740 | R | 1 |
| 7/32 in | 740 | R | 1 |
| # 9 | 740 | R | 1 |
| # 22 | 1100 | R | 1 |
| # 32 | 1530 | R | 1 |
| # 39 | 2100 | R | 1 |
| # 40 | 2100 | R | 1 |
| # 40 | 2100 | L | 3 |
| # 39 | 2100 | L | 1 |
| # 32 | 1530 | L | 1 |
| # 22 | 1100 | L | 2 |
| # 9 | 740 | L | 1 |
When drilling the holes, be sure to apply the Oatey Dark Cutting Oil (or similar). I like to line up the bit first, and then carefully squirt a few drops directly from the bottle onto the bit, allowing it to drip into the hole you’re about to cut. If you do this carefully, you can limit the messiness. Then just drill slowly, backing off frequently, especially if there is any sign of smoke. With the larger holes, you may need to stop and reapply cutting oil 2 or 3 times.
When it comes to finishing the rails, you might have seen various recommendations that they should be trimmed down to some very specific dimensions. For example, I’ve seen various recommendations between 0.855″ and 0.865″ for the width of the rails, sometimes with slightly different dimensions suggested between the front and rear rails.
I’ve measured a few different OEM SIG Fire Control Units and come up with slightly different numbers. So I’m not actually certain what the “official” dimension is supposed to be. I’m sure there is some standard set of dimensions that will work OK for almost any slide with a fairly wide range of acceptable tolerances. But when you’re building your own gun, you have an opportunity to do better than just OK or acceptable!
So my preference is to try to tune the rails to the specific slide and maximize performance. I usually file the rails down to about 0.870″, then start the tuning process. Keep trying the fit (with no lubrication yet) and slowly file down the rails evenly until the slide moves with only the very slightest of resistance and no wobble. Remember, you can always file the rails down further, but you can’t easily increase the width if you file down too much. In the end, it should be possible to build a gun that runs at least as smoothly as a factory unit, and maybe with a little better accuracy, or at least no sloppy slide wobble.
So, about that P320 build chambered in .45 ACP . . .
I’ve always been a fan of the .45 ACP. But when I decided to try to build a P320 chambered in this caliber, I soon discovered that there is a general lack of information out there. That’s what actually started me down the path of writing this blog post in the first place.
You might have heard that the P320 in .45 ACP has some differences from the same gun chambered in 9 mm, .40 S&W or .357 SIG. JSD, on their web site says the MUP 1 can be used to build a 9/40/357 version, or a 45 version “with slight modifications,” but they keep you hanging as to what those slight modifications might be. Well, after doing a fair bit of research, and talking to the good folks at JSD, I finally have all the details, and I’m sharing them with you now.
First, the primary mod you actually need to make to the MUP 1 itself is to shorten the ejector slightly. The unmodified ejector on the MUP 1 is about 0.567″ long. Again, I don’t know what the exact “official” OEM dimension should be for .45 ACP, but something in the ballpark of 0.492″ seems to be ideal.
I usually cut and file down the ejector to about 0.52″, take it to the range, then file down a bit at a time until it gets to the point where ejections seem to be ideal. Again, it’s always easier to file it down a bit more later. It’s not so easy to reverse the process if you file it down too much.
Then, there are two small parts for a P320 .45 ACP build that are different from a 9/40/357 build:
- You want the Slide Catch Lever specific to .45 ACP. It is included in part # KIT-320-SCL-45 (along with the SCL Spring and SCL Spring Post, which are the same as used in a 9/40/357 build)
- You also want the .45 ACP version of the Take Down Safety Lever, part # 1302197-R
It’s not especially easy finding these two parts sometimes, but they are out there if you look hard enough. As I type this (Feb, 2021), the KIT-320-SCL-45 is currently available directly from SIG SAUER and the 1302197-R is available from Midwest Gun Works. You might also check AB Prototype and eBay.
Finally, you’ll also need the grip module for .45 ACP, which is different dimensions from the common 9/40/357 grip modules. AFAIK, the only .45 ACP grip modules out there are the original SIG OEM P320 models in various sizes. There is no X-style grip module for .45 that I’m aware of. Of course, you’ll also need a slide, barrel and magazines specifically for .45 ACP.
One common issue I’ve noticed specifically with the .45 ACP P320 build using the MUP 1 is related to magazine fitment. The problem is that the magazine fit is extremely tight, to the point that it’s difficult to fully seat, and then nearly impossible to remove. Once you do get the magazine out, you’ll notice that the two two back corners were scraping at the top, against the MUP 1.
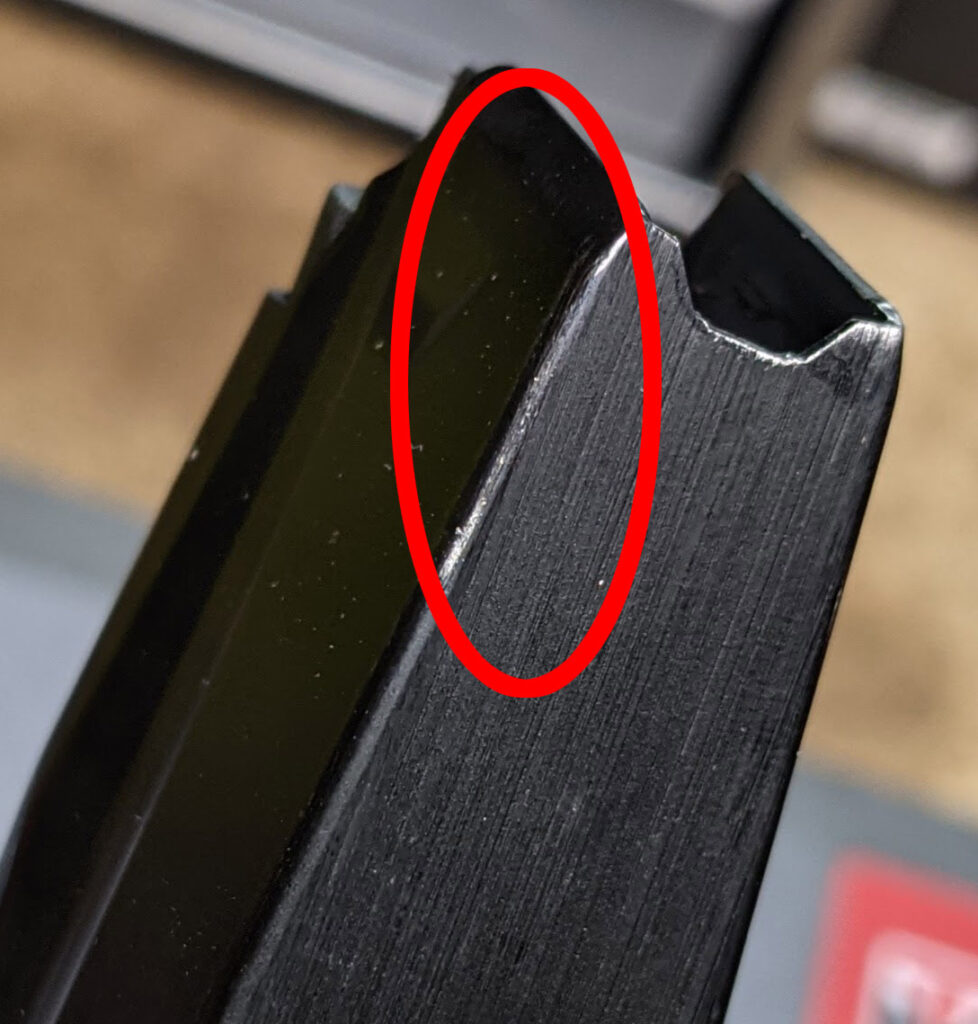
To resolve this, you can simply file down the corresponding corners on the MUP 1, as shown below. You might even hit the front edge of the sear housing ever so slightly. It doesn’t require much to make a big difference.
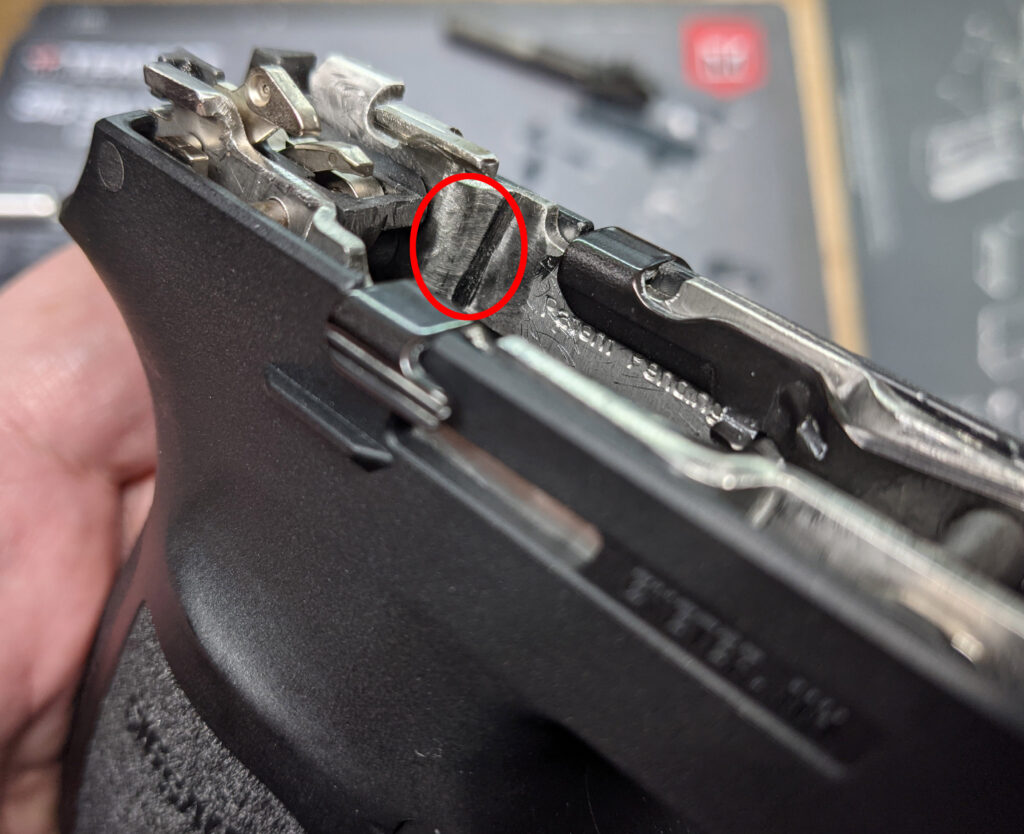
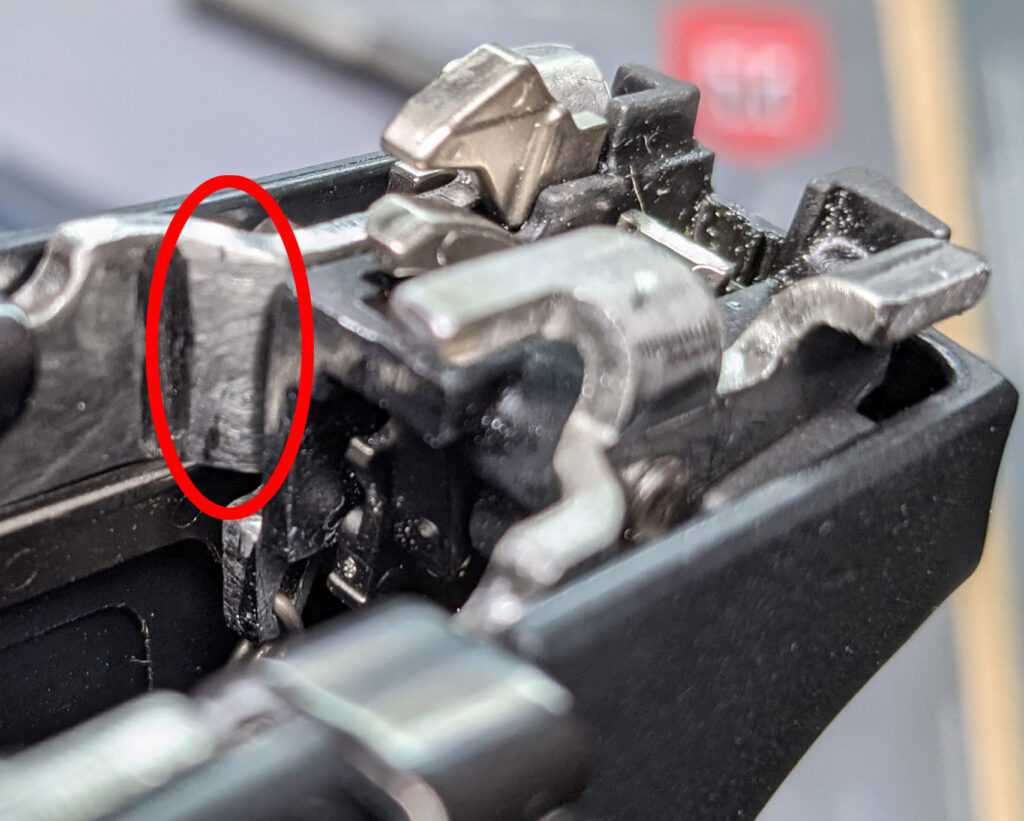
It might take a few iterations of trial and error, but you’ll eventually be able to get the magazine to drop freely. Remember, take it slowly, and don’t overdo it.
So that’s it! I’d definitely encourage you to jump in and build your own P320. I think you’ll be really happy you did.
What questions do you still have that I might be able to answer? Have you built your own P320 and have some additional tips or suggestions to add? Did I get anything wrong here? Jump in the comments below and let me know! Happy building!
WOW!! Thank you so much! The main reason I purchased the JSD 320 was to make it a 45. But as you point out there really isn’t any info out there to do this. This article makes it straightforward on how and to where to purchase the needed products.
Thanks for the kind feedback. Glad it was helpful!
Thank you so much!! This is very helpful and gives me the confidence to try one. Appreciate your time.
God bless.
Glad to hear this. God bless you as well!
Hi Tim – Thanks so much for posting this! I’ve been meaning to build my P320 for almost a year now and this was very helpful, especially in regards to a .45 ACP build(I share your pain about the apparent lack of detail on what “slight modifications” and different parts meant). I was hoping I could accomplish this without having to invest in an full drill-press but seeing as how I haven’t gotten anywhere with a normal drill and the bits that came with the MUP I’ll have to try out those cobalt tips.
Awesome. Let me know how it goes!
Hi Tim, thanks for the information, super helpful. I’m getting ready to build a compact 45. I have everything except the for the 2 45 specific parts. It’s good to know that the 45 version is doable. I have a 9mm version and can’t wait to get a 45 version also.
I think you’ll be happy with it. I really enjoy the P320 in .45!
Great article Tim, I have completed a .45 ACP 320 conversion. A couple of things I discovered is that in the MUP-1 you can use a readily available shortened takedown safety lever for the 9mm -.40 in the .45 conversion. You will have to remove a small amount of material on the inside of the lever to allow the longer .45 magazine to insert. It takes a few minutes to remove the material with a dremel tool and carbide bit, but it works flawlessly. Also the slide stop from the 9mm -.40 works just fine. I ordered a .45 slide stop and it’s identical to the 9mm-.40 one. Once the ejector is shortened a slight amount, you’ll have a FCU that’s ready to insert into the .45 ACP grip module. Add the .45 ACP slide, barrel, and recoil spring and you’re ready to hit the range. Mine fired and functioned without any problems.
Thanks for the info! Hopefully this helps out some other folks.
Hello Tim. Great article. Thanks so much for sharing this info with us. I see you included the width of the slide rails. I am wondering if you have the dimensions of the heights of the rails, measured when installed in the jig so as to get an accurate measurement, from the top of the bent tabs to the bottom of the jig base. I bent them till they were as flat as possible, with major hammering, so there was no daylight between the bent tabs and the jig sides. This turned out to be too low, as I had major difficulties installing and operating the slide. I had to disassemble the slide when it was stuck on the frame, just to get it off the frame. The perfect dimension would really be nice so I know when to stop banging on the jig. Thanks.
Thanks for the kind comments. Unfortunately, I’m living in Puerto Rico now, where building your own unserialized guns is illegal (at least as I write this). So I’m sorry to say none of my personal hand-made firearms are here with me, nor any of my related gunsmithing hardware. So I don’t really have a good way to answer your question. Maybe someone else here can help?
I was successful building a P320f 45acp. Thank you for your research. I’ve been able to compare the ejector length to the OEM 45acp and 10mm FCU. The OEM 45 ejector is 0.4675”. I found that your recommendation on the article actually works a little better for me and was backward compatible in a P320 9mm, whereas the OEM 45 FCU was not. Also your recommendation is very close to the 10mm ejector.
Thanks for the great feedback!
What’s the oem 10mm ejector length?
Sorry, but I have no clue. i now live in a jurisdiction where the local government doesn’t approve of my right to build unserialized weapons on my own. So I am sadly out of touch with recent developments in this space.
Thank you for your great tips. This is the only place I was able to find the “slight modifications” made in the .45ACP build which I am considering building next. I have one reservation though. I’m hoping you can shed some light on why Sig Sauer seems to be bailing on the P320 45ACP version. Is there something undesirable about it?
I had no trouble building a P320 9mm. I have the MUP-1 jig and JSD has the insert on sale for $69.99 right now. Plus Sig Sauer has their Standard Full LG. FDE Grip on sale for $14.99 now! I’ve got the itch! I just want to make sure that I don’t end up saying “… if I only knew”. Would you have any reservations about owning one if you were me?
Yeah, I understand your concern. It does seem weird to me that SIG hasn’t really given any love to the .45 ACP in recent variants of the P320. The new X-TEN is really interesting. My sense is that a lot of interest is building in 10 mm, as it has a lot of advantages over the venerable .45. Personally, I don’t let this affect my decisions, as I have lots of different guns in a wide range of calibers. I guess if I could only afford one or two guns, maybe that would slightly steer me away from building the .45 ACP version of the P320. But I certainly have no inside information on their long-term plans.
You must trim the case ejector on the MUP as well when building the .45
Yes, and I think I covered this pretty thoroughly in the article.
Hi Tim,
I’m building my first P320. I one MUP-1, and I ordered two more. JSD is out, but I paid the extra for the ABprototype resale they have. Are slides now going to be controlled with Biden’s announcement today on 80%? I know your not a lawyer, but from what I read, it just applies to the complete kit sales. I want to learn how to build and repair these things. That is why I don’t just go buy one. I’ve done the AK 15 years ago. I haven’t done the 80% AR, but I have assembled several from parts. I really enjoyed the process, and learned a lot.
Yeah, recent news is pretty discouraging. I’m certainly no lawyer, but I’d be willing to bet many of the ATF’s recent actions are not going to stand up to a review by the courts. We’ll see.
Thank you for your cogent article. I have 2 blank MUPs I had allocated for 2 .45 acps, and, as you said. I couldn’t find anything on the “minor alterations.” I even emailed JSD about it, but got no reply. With what’s going on in the industry, that’s not surprising.
Thank you!
Thanks for the info on the 45 acp builds I did two in 9mm and wanted to try a 45. Excellent info the best I’ve seen on any website so far
Thanks!
Hi Tim,
Thank you for an EXTREMELY informative article. I have but one question and I apologize if this is a noob question. You list the drill bits and holes, but those numeric sizes don’t necessarily correspond to fractional sizes or metric sizes for that matter. Since you advocate using cobalt bits vs. the ones supplied by JSD, what are the appropriate bits to use in lieu of the JSD ones? I have a large cobalt bit set but I’m not sure how the numeric size translates to fractional.
Thank you in advance!
Thanks for the feedback. There really isn’t a good direct correlation between bit sizes. It’s kind of a messy system, honestly. Here’s a chart that might help. But bottom line, you just need to get the correct # sizes.
https://www.cnccookbook.com/drill-chart-bit-sizes-decimal-number-letter-metric/
Hey Tim just discovered all of your bountiful knowledge as you know alot of videos have been taken down about the process of this could you send me any links you may have? MGB’s videos are tough to track down.
Thanks for the kind words. Honestly, I have no idea how/where to find MGB’s videos these days. I see his YouTube channel is back, but not any of the old content. Sorry. 🙁
Are you able to show the differences in 3 different Takedown Safety Levers. I know the one is post vs pre upgrade but where is the difference physically and can you use the .45 one on a non trigger disconnect upgraded version?
1302197-R vs 1302166-R vs 1300734-R
I honestly don’t know the answers, and at the moment, I’m halfway around the world from my shop, so I don’t have access to the parts to even look. Maybe someone else can jump in here with clarifications and/or pictures?
Just want to say thank you so much for this article. I’ve made multiple P320s and this guide was best one I found. JSD supplies assembly videos were great as well.
But, when it comes to the 45acp, this guide is simply the best by far. I followed it closely and my P320 45 is amazing. So, thank you!
This makes me so happy to hear. Thanks for the kind words!
Tim,
Thanks for the information on the 45 modifications. A friend and I are going to build our X10’s tomorrow and I’m guessing that much of what you had to do to your 45 will apply to our X10’s.
Ron
Thanks for the kind words. Good luck!
I’ve had this 80% .45acp kit for almost 5 years and still has never fired. Everything goes together fine, and I can load it fine, but the striker will not drop. No one has been able to give me an answer for this including the manufacturer. I’ve built dozens of AR-15’s and even built AK’s from parts kits, and 80% 1911’s that all function flawlessly but not this sig.
Any idea what might be causing the striker to not release?
Sorry to hear of your issues. And I’m also sorry that I can’t provide any specific assistance.
Hi Tim
I have built a 9 m and a 357 sig
But now a 40 cal is nice and am afraid of the 45 c due to the lack of parts available
Are you sure these special parts for 45c can be bought?
Also is the standard FCU the same for all calibers ?
I haven’t tried to source the parts in quite a while, so I can’t offer any advice. But I’m sure you can find them with some patience. Yes, the FCU is the same, with the mod described in the original post.
THANK YOU SO VERY MUCH for such a well put together, easily laid out set of instructions, I especially liked the drill press speed guide & the section on the .45ACP mods was pure gold too! I was always intrigued ever since reading it on jsd’s website but never saw how, now I might have to grab another FCU and give it a shot. Since I first started building back in the days when MGB forum was still active before he took it all down, I took screen shots of this in case it was ever taken down in the future, I would have it to share with others……god forbid that happen though!
Thanks!
1st OFF, WHAT AN INCREDIBLY DETAILED GUIDE, especially post Biden Regime makes it truly rare! lol but ya I did want to add one thing about the .45 ACP version WILL REQUIRE YOU TO SHORTEN & CUSTOM FIT YOUR EJECTOR. They describe the process in an Sig Sauer Forum I just don’t remember which, just search for “MUP-1 mods for .45acp” or “differences between .45acp & 9mm MUP-1”
Pretend the jigs became sold out everywhere and impossible to obtain.
Also pretend you’re very well stocked with tools and 3d printer, and can print a model of a similar jig for drilling.
How would you specifically go about bending the rails if you had to do it “freehand”?
Mini brake bender in vice? Something else?
Marine Gun Builder’s forum doesn’t exist anymore, seemingly. No reference to Sig anything on his site either. Just Glock glock glock.
Thanks. Good stuff,